NEW CLICK HERE FOR AMAZON PRIME!
NEW CLICK HERE TO SEND US A GIFT! A COOL IDEA TO HELP US FOR HELPING YOU!
|
|
HAM RADIO PSK AND DIGITAL MODES:
DIGITAL COMMUNICATIONS
This eBook is meant to be a starting point for the ever increasing number of
people wanting to get into amateur radio digital modes of communication. I hope
this makes getting started in Digital a glad and easy experience. Even if
interfacing using other manufacturers interface devices other than from Donner's
Digital, most setup procedures are similar, so this material should still be
useful.
Computer
Requirements:
For modes other than SSTV,
it is recommended to use a PC that runs at a minimal speed of 100 Mhz. Some
success has been attained as slow as 75 Mhz, but that gives little or no margin
of resource. Memory recommendation is 32 megs or more. Your best bet is a 300
Mhz (or faster) machine, with 64 megs (or more) of ram. The PC needs at very
least, a 16 bit Sound card, ie: SoundBlaster Pro. Please note that some
softwares for digital communications use a direct access to the sound card
hardware, and in some instances, Soundblaster "compatible" cards may not work.
It is always best to use a Creative Labs Soundblaster card (Pro, 16, 32 AWE, 64
AWE) when possible. A "compatible" card will work usually; but it depends on the
software being used. Some programs will work with most cards, but keep in mind
that if you have problems, you may need a genuine Creative Labs card.
Always install the latest driver available, since older drivers might contain
bugs. Some programs which run under 32 bit operating systems may require a 32
bit sound card driver. Some drivers for Windows 95/98 may actually be a 16 bit
driver instead of the 32 bit driver that you need.
Having tried several types/brands of sound cards here, we have had best
results using an inexpensive Crystal Fusion card, which is also stable enough
for SSTV. Video is not too demanding unless one wants to operate SSTV, and then
all resources need to be faster and stronger. The PC should have at least 1
free serial port, preferably a DB-9 style connector.
We have learned from personal experience, as well as from several of our
thousands of customers, that not all computers lend themselves for digital
communications requirements. An example of this is a Dell Inspiron Laptop. A
good machine, but the worst choice for digital use. This machine is notorious
for the serial port coming up high on startup, and along with that, a serial
voltage much lower than standard. There is a software fix to cure the high
start, but none for the low port voltage. There have been reports of a few
Compaq laptops also having low serial port voltage, but from experience I have
only incurred the trouble with the Dell. When we go mobile/portable, we use an
IBM Thinkpad, or a HP laptop. Nearly all desktop computers seem to do the job
very well.
Having tried nearly every available software, we found ease of setup and operation in available freeware, that will surpass that found in shareware. My hat is off to the programmers who make the marvelous free software available.
I highly recommend new users to try Digipan first. This is a great PSK31 freeware, and I will be using screen captures from this software to show new users how to setup. After you have a handle on how to operate, then you might want to test drive a fancier software.. I use mostly Hamscope here, and PSK31 Deluxe. Hamscope will do a great job on RTTY if you download the MMTTY Engine from the MMHamsoft web page, and put the file in the Hamscope directory. They mesh well. The regular MMTTY software is good, but making and using macros leaves much to be desired. This is why I use the Engine only, in conjunction with Hamscope, which has lots of macro buttons available, and are very easy to setup and use.
Connections and Setup:
Some rigs are connected via only 1 data port, where some use as many as 3 connections to the radio. We will break the interface down into it's 3 sections.
TRANSMIT AUDIO SECTION
PTT SECTION

Most software programs that will allow transmission, utilize the RTS or DTR pin of a serial port in conjunction with an optoisolator, or relay, to switch the PTT. With some software, the Vox circuit of your radio can do the switching, instead of a relay, etc., but Vox will usually not work with rigs where you are connecting to a data port.
Depending on the radio being interfaced, this can use only a few cables, or several. If your radio has a Data or Accessory port, that is the best spot by far to connect to, as one can normally leave the interface connected always, without interaction from mode to mode.
The soundcard on the computer may have 3 or 4 ports. On cards with 4 ports, one is for a mic, one for line in, one for line out, and one for speakers. On cards with 3 ports, they are usually as follows: mic, line in, and speaker. If you have one with only 3 ports, not to worry, as a "Y" adapter can be obtained at Radio Shack, which will allow you to use some of the output that goes to the speaker. One can realistically use the mic jack of the sound card instead of the line in port, but that jack is normally a mono jack, and does tend to over drive the audio coming in to the computer. You will want to use the line in and line out jacks if they are both on your soundcard.
In looking at the computer sound card settings, you will find many different controls, for many functions. Normally you will be interested in line in, master volume, wave balance, and speaker. Start with the controls mid way open, and nothing muted. A bit of experimenting will show you which ones that you need or do not need. To bring up the soundcard controls, you can double click the small speaker icon in the lower righthand corner of your monitor. You should get a screen that looks similar to the one shown below. It shows the overall controls that are being used.
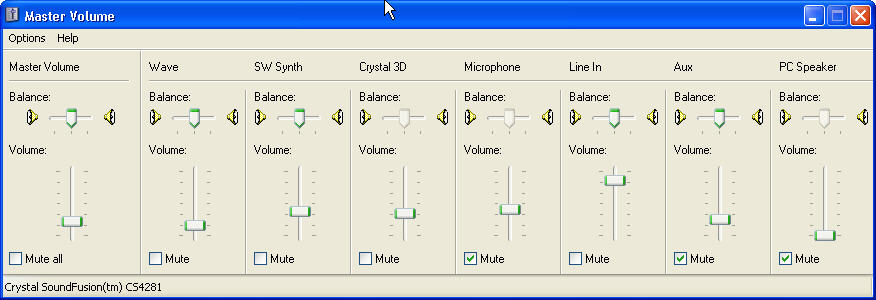
If you click on "Options" on the above menu, and then the Playback button, you will get a screen similar as below. You can checkmark the controls that you want to use. After making your choices, click OK, and you will have the selected controls on your screen to adjust.

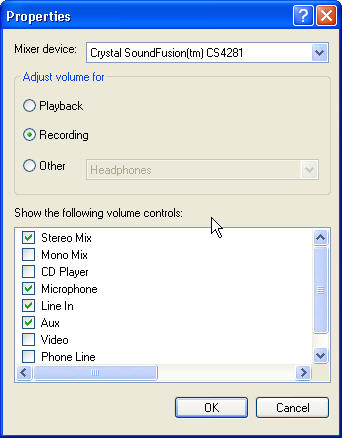
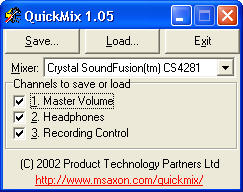
Make your selections, click OK, and then adjust the appropriate controls. You should now be either ready to go with the sound card part, or very close. You may need to fine tune the adjustments. If you use the soundcard for other applications as many folks do, other things may use different volume settings, so you will want to find, and download a wonderful freeware named QuickMix. After your settings are where they should be for each and any application, simply save the settings in QuickMix with an appropriate name: ie: Digital, MP3 recorder, etc etc., and when you use the other software, you can load the settings which worked well for you. Below is a screen shot of the QuickMix loader.
Now we are ready to load and setup a software. In this section, as
previously mentioned, I highly recommend using Digipan if you are a new user. I
say this because if you select a serial port that is not available for your PTT,
after you tell it OK, and then go back to the port setting, it will revert back
to "none". More than likely, you will be using com1 or com2, as these are the
most commonly used.
Load Digipan software, and then click on the Configure button, which will show
up as below.
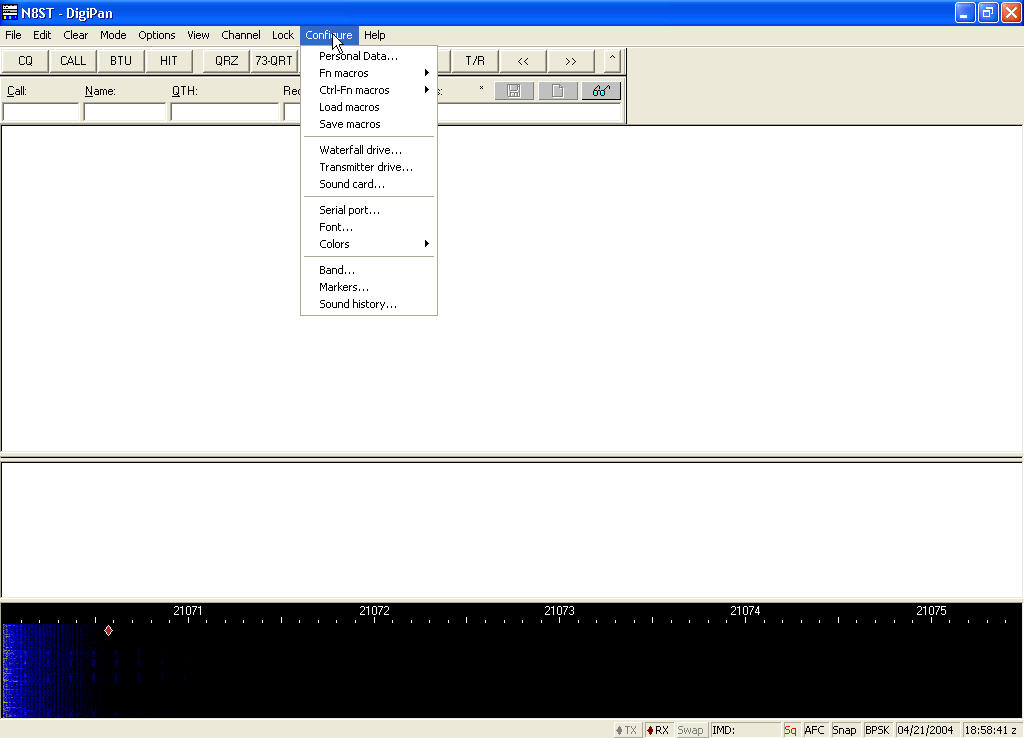
Selecting "Waterfall Drive", will bring up your recording control as shown
below, and on most applications, you will actually only need to have "line in"
selected.

You are now, at best, having some gibberish showing up in the receive area of
the software. Now put your mouse arrow on one of the yellow lines coming down
the screen, and click it once. You will then be copying the station that is
transmitting.
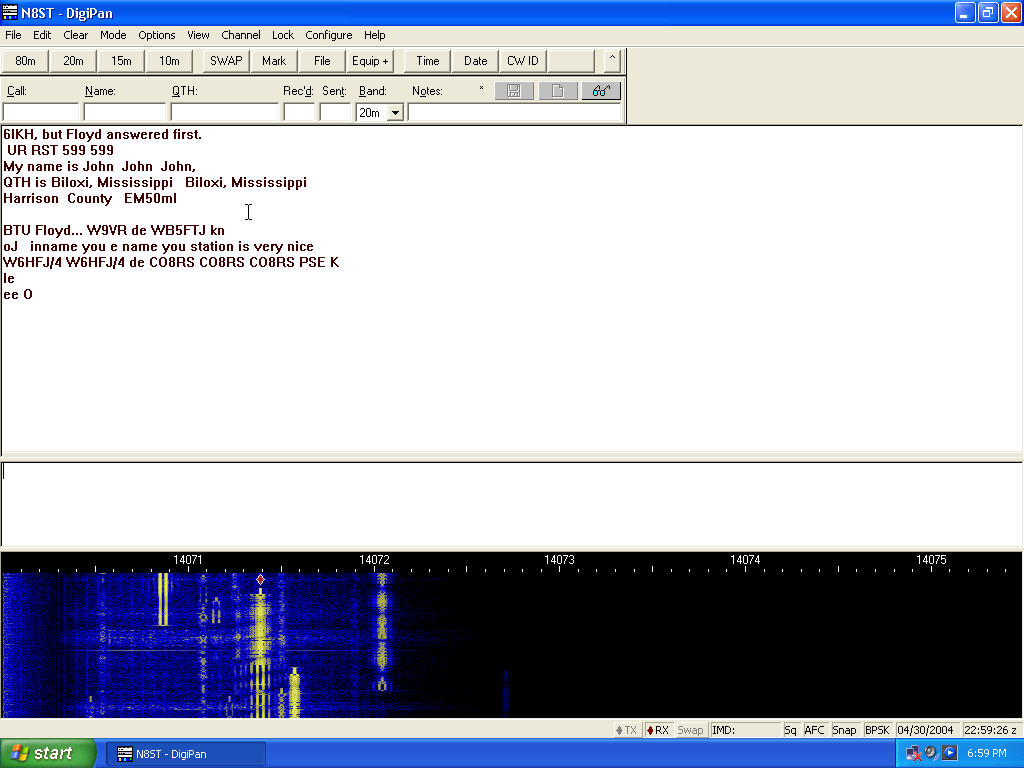
You will find that PSK31 (BPSK) is probably the most effective mode there is
now. In theory, there can be over 90 stations in QSO at one time, in the
bandwidth required for 1 SSB signal, and not QRMming each other. We have seen
many times when there were over 20 stations on the falls at one time.
Next, you will want to try to transmit. First
turn OFF your speech compressor
if you have one. If you have a menu on your rig which allows you to set a
certain power level, set the power for 15 to 20 watts. This is all the power
that you will need. Not only are the digital modes a "key down" situation, but
higher power, or mic gain set high, will only tend to give you a wide dirty
signal, and cause interference to other operators. If your rig does not have a
power control, the output can still be controlled very easily. Use upper
sideband for digi modes. The Digipan config menu has a Transmitter Drive button,
which will bring up your playback controls, as shown below.

Again, as on the recording control, you will usually only need 1 or 2 items
selected, usually "Wave". Now, assuming that you are in the proper part of the
band, and you can see other stations on the waterfall, find a clear spot away
from the activity, and click that spot with your mouse. That is where you will
be on the waterfall. If your rig has a power menu, and you have it set for 15
watts, click on the TX control on the Digipan menu, and quickly adjust the
Transmitter drive control in Digipan, to where your output meter shows the
proper amount of output, with a minimal amount of ALC. If your rig has no
power adjustment, adjust the control as mentioned above, until your output shows
15-20 watts, which should reflect a low ALC level. You are now on the air.
Don't forget to ID!
Again, you might want to save your settings into QuickMix.... save it as Digipan.
Most other software will be right in the ballpark with these settings, but if
you play games and other items that use the sound card, they may use more volume
than the digi modes.
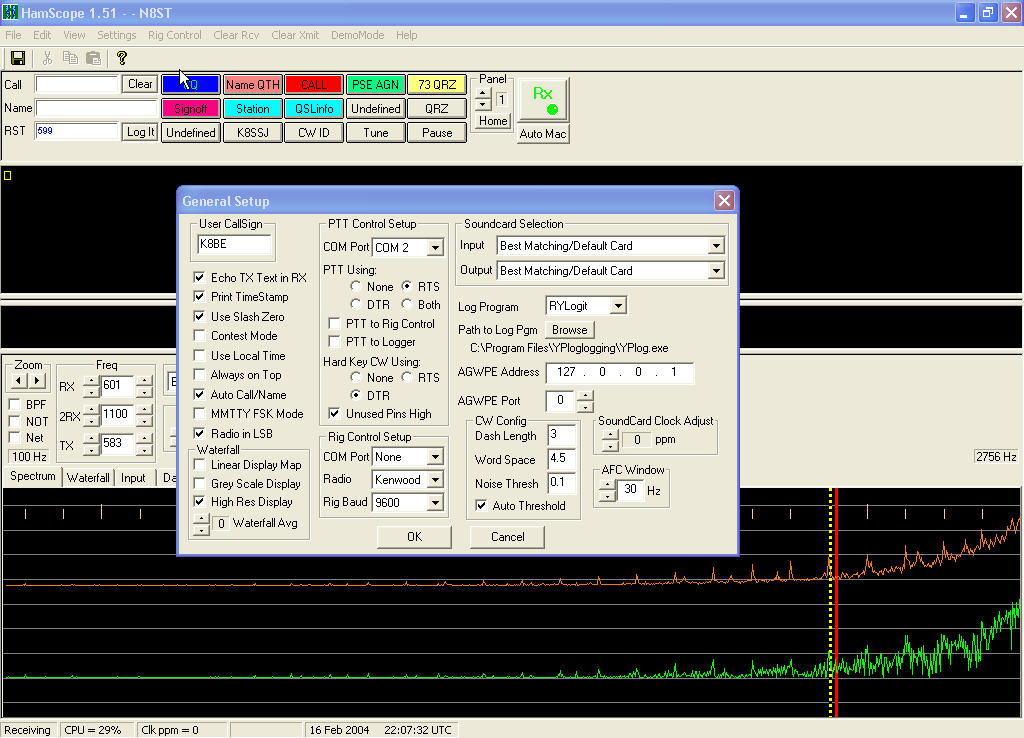
As you can see on the above image, Hamscope has many bells and whistles, including provision for rig control. One can do packet also, by putting the AGWPE in the same directory as Hamscope. It will hard key CW, and is also easy to setup and use.
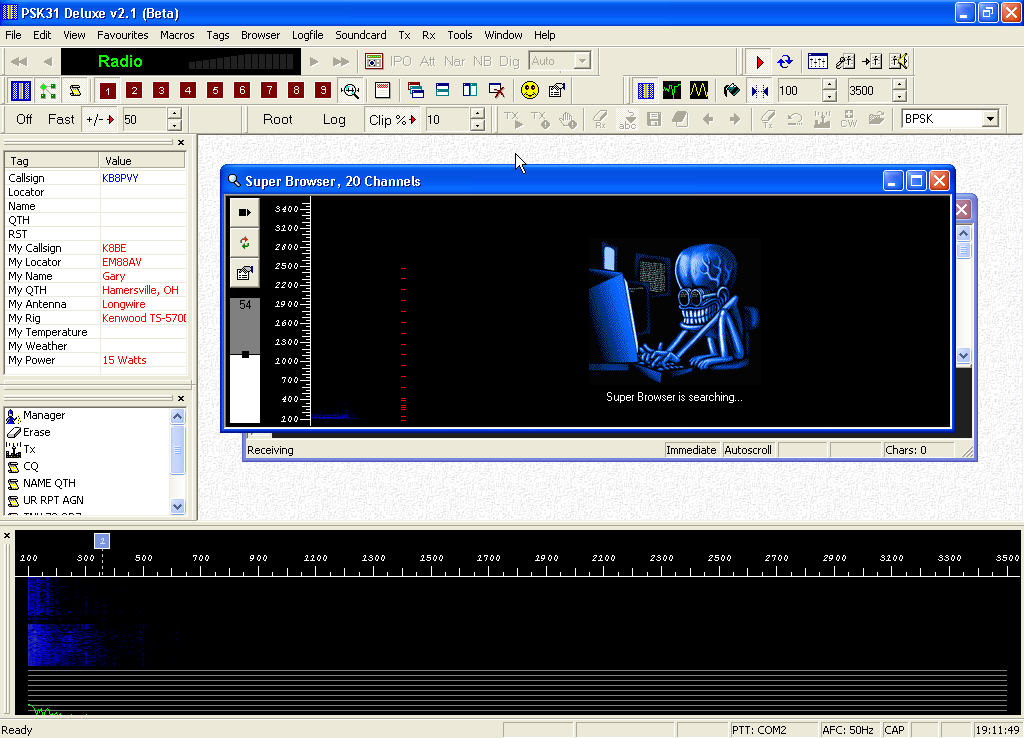
When using the Super Browser, you can not only see as many as 20 stations at one time, but actually see what all of them are typing at the same time. This is another fabulous freeware, and easy to set up.
Audio: This has been pretty much hashed over earlier, but if you have trouble getting audio in or out of the software, make sure that you are using a 16 bit or better soundcard. Most computers built in the past few years are at least that strong, if not stronger. Make sure that your interface cables are connected to the proper jacks or ports. If you do not know which controls to use, and which are not needed, turn ON all of them, and set the level to mid range on all of them. Don't mute any of them. Do this on receive first! If you still do not get audio in receive, chances are that the soundcard is bad. This does happen from time to time. When you have RX audio, find which one(s) are needed by clicking the mute on one by one. No need to keep unneeded items to confuse things.
If the RX audio is now working, but no TX audio, do the same as above.... trial and error method.
PTT: If you are not achieving PTT, first check to be sure that you have chosen a valid serial port.
If you are using a valid port, then here are possible solutions to the rig not keying. Are you using a laptop computer or a conventional machine? As mentioned in the beginning of this tutorial, some laptop computers have too low of serial port voltage to operate the keying circuit of the interface. If you have another computer available, try that one to see what happens. If it still does not function, then either the port that you are connected to on your radio is faulty, or the interface itself has a problem.
We have found that some rigs, even new ones, have defective accy ports... not many thankfully, but it does happen.
On not just our interfaces, but interfaces made by other manufacturers, there are not many weak points, except for the keying circuit. To zero in a bit, basically the optoisolator (or transistor in other manufacturers units) is the only weak link, but actually not that weak. With electronics, a part that has a flaw, will usually go out very fast. Even though we use first class parts, from very reputable suppliers, we have had optos go out. Usually they blow when I have them on my test bench, while testing and presetting the interface. If they work for longer than a few uses, they will run great for years. During the first 30 days of using our unit, if the chip blows, we will send another to you at no cost. They are socketed, and simple to replace.
Advanced Testing:
For folks that are adept at testing electronics, and have even an inexpensive volt/ohm meter, the following tests can be made: First, test across the correct pin for PTT on the data plug or mic plug, to the ground pin. WIth the software in TX mode, there will be a reading from 120 ohms (lower ok) to 180 ohms. That is normal, and the unit is working. The meter will initially be low, and rise to it's max reading when under test within a few seconds, which is similar to a soft start. If the interface is functioning, but your rig is not keying, your rig probably has a bad data port.
If there is no reading, test where the serial lines connect to the circuit board. When in TX mode, there should be close to 12 vdc. If the voltage is less than 10.75 vdc, chances are that you have a too low serial voltage problem on the computer. If the voltage is in range, the opto has gone out. During the first 30 days, if the chip goes out, we will send you a new one free.
This is a more in depth recap of the troubleshooting section.
PTT does not work?
First, if you are not sure which com port is free, or if it even works, Use Digipan. If you set a com port that is already in use by a mouse or something else, when you click "OK", and go to the operating menu of the software, go back to the menu again, ans click serial port again. If it has reverted back to "None", the port that you chose is either not available, or does not function. The digital interface uses RTS to key the rig, however the default in Digipan is RTS & DTR, which is just fine. You can leave it set that way.
Still no luck?
Some rigs need to be told in their menu to make a connection operable, or to activate a data port. I have no idea which rigs need a menu setting to allow PTT from a data port. For this information, you will need to consult your manual. I always welcome any information about different rigs, so that I can help other folks that may not understand their equipment as much as others.
More thoughts....
Some computers, especially laptops, as mentioned earlier, do not have enough voltage available on their serial port to operate the optoisolator. There are even a few desktop computers that fall into this category. The PTT circuit of the interface requires close to the standard serial voltage of 12 vdc @ 60 mils. They are a little bit flexible, but not too much. The limiting resistor feeding the optoisolator is of a value that will allow proper keying, and also long life of the chip. There are few computers that fall into the low voltage category, but they are out there. The chip needs between 1 and 1.5 vdc at it's internal LED to key, and this is governed by the limiting resistor. There have been a few folks that changed the resistor to suit their equipment, but we only build the interfaces to standard voltages. The optoisolator is more demanding on voltage/current than a transistor, which will key on most any reasonable voltage, but a transistor does not afford your equipment the safety of full isolation. Most computers, especially desktop types, are more often in the correct voltage range.
No free serial ports?
This has become a bit more of a concern as computers evolve. If you do not
have a free DB9 port, you have two choices ... You can add a serial card. Or you
can use a USB to Serial adapter. We sell one on our webpage, but you don't have
to use this one. Any USB to serial adapter should work. Be sure to install the
driver which comes on a CD with the adapters. If you don't install the driver,
Windows XP will not assign the adapter a comm port number and it won't work.
Rig has port problems?
If everything looks good and still no keying, do not rule out the data port
on the rig. Having had thousands of customers, we find from time to time that a
port on the radio is bad. Fortunately not on many. We have heard from some
IC-706 users that have had bad 13 pin DIN data ports, even a couple that were
not wired internally. There have been a few IC-718 users (also with 13 pin) who
also had port problems. The 706 rigs are notorious to not key when using the 6
pin mini DIN connection for some reason, so we refrain from making the mini DIN
interfaces for the 706 rigs. No other port problems reported yet.
Chip has blown?
Each interface has been tested before shipping to assure that all sections
of it work properly, including pre-setting the tx audio to a level that seldom
needs to be changed. Usually, when an electronic component is faulty, it will
blow right away. Usually when a chip is marginal, it will blow on our test
bench, but they can go out most any time. After looking through the above, and
perhaps even checked the available serial voltage, you find that there is no
keying, we are, in most circumstances, willing to send you a new chip, if you
feel that you can change it. The chip is socketed, and easily changed. This
holds good for users in North America, who have just received their interface.
For those folks out of North America, we will only ship another chip if they
cover postage. If you do not feel adept in changing a chip, you can send the
interface back for a repair, however you will need to cover the postage both
directions.
If you have a volt/ohm meter, this is an easy task. Open the interface box, and observe the position of the chip. Note the indentation or dot on the chip, which denotes pin 1.
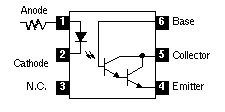
Any thoughts, information, or suggestions are always welcome. 73 es Have fun!
June, 2004: There have been some problems recently with "Homeland Security" killing chips in some of our interfaces while doing some sort of radiation scan on postal packages, designed to kill anthrax spores, etc,. That plus the increasing number of new PC's with serial voltages too low to key optoisolators, has prompted the need for additional methods of keying our interfaces. In keeping with the full isolation that our units afford, we have begun to switch to reed relays, which key at a lower and broader voltage range than the optoisolators did.
Looking ahead, eventually, the serial ports will give way to USB ports, or/and lower available voltages, so we have looked into addressing this issue, and found recourse, but for now, we will stay geared for the PC's which the multitude of users have available. The change that we have adapted for the current interfaces is to replace the optoisolator, and it's line resistor, with a reed relay and a 1N4148 diode as depicted below:
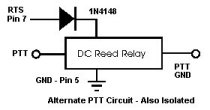
Eventually, we will drop to 5 volt solid state relays, possibly keyed via USB ports, but at this time, we can find no economical way to proceed with this approach. We attempt to keep our prices very low, as this is our way to give something back to the Amateur Radio Community, but if we can find a way to obtain quality parts priced good enough to retain our current price, or very little increase, we will pursue that avenue.
Note: This is another possible implementation to be addressed in the future. Thank You Eric.
Note: The reed relays we are now using have a very low contact resistance, so this should not happen anymore with rigs critical to resistance. Thank You Peter for your information.
When using Packet in Hamscope via the AGW Packet Engine, you will not be able to use a rig control, as the AGWPE takes control of the serial port when in Packet mode. Our rig control uses the RTS and DTR lines to power the rig control interface, so with the Packet Engine drawing from the serial lines, there is no power for the interface, which is a weak point, but only if using our rig control while using the AGW Packet Engine.
Bob cured this situation by feeding power to the rig control from the 13.8v pin on his rig.
Note: This topic was touched upon lightly above, regarding low serial port voltage. Thank You Bob for sending this information along to me.
A FEW FQ'S:
DIGITAL MODES SOME POPULAR FREQUENCIES FOR DIGITAL & SSTV MODES
160 Meters 1.838.150 PSK31, Stream, Etc. 1.890 SSTV 80 Meters 3.580.150 to 3.620 Data (RTTY, PSK31, Hellschreiber, Stream 3.620 to 3.635 Packet 3.845 SSTV 40 Meters 7.035.150 PSK31 7.037 Stream, Hellschreiber 7.080 RTTY 7.171 SSTV 30 Meters 10.130 PSK31 10.130 to 10.140 RTTY 10.137 Hellschreiber 10.140 to 10.150 Packet 20 Meters 14.063.5 Hellschreiber 14.070.150 PSK31 14.070 to 14.095 RTTY 14.080 Stream 14.100.5 to 14.112 Packet 14.230 SSTV 14.233 SSTV 17 Meters 18.100 to 18.105 RTTY 18.103 Hellschreiber 18.105 Stream 18.105 to 18.110 Packet 15 Meters 21.063 Hellschreiber 21.070 to 21.100 RTTY 21.080.150 PSK31 , Stream 21.100 to 21.110 Packet 21.340 SSTV 12 Meters 24.920 to 24.925 RTTY 24.925 to 24.930 Packet 24.929 Stream 10 Meters 28.070 to 28.150 RTTY 28.080 Stream 28.120.150 PSK31, Hellschreiber 28.680 SSTV 28.690 SSTV (some SSTV repeaters on this Freq.) 28.700 SSTV 6 Meters 50.680 SSTV 2 Meters 145.500 SSTV(National SSTV Simplex Freq. for FM) 145.550 PSK31, Hellschreiber, Stream 145.600 Alternate SSTV 145.650 Alternate Digital |


